

この記事では、VPS上でHFMのMT4をインストールし、EAを稼働させるまでの手順を画像付きで解説していきます!
 ゆーしん
ゆーしんEA導入方法がわからない方や不安な方は、この記事の手順通り進めていくことでスムーズにEAを稼働させることができますので参考にしてみてください!
HFMの口座開設とVPSの登録が済んでいる状態で進めてください。
HFMの口座開設がまだの方は、以下のブログ記事を参考に口座開設を行なってください!

VPSの登録がまだの方は、以下のブログ記事を参考に登録を行なってください!
 ゆーしん
ゆーしんそれでは早速VPS上でMT4をインストールし、EAを稼働させるまでの流れを解説していきます!
①MT4のインストール
まずはVPSを接続してWindowsの画面を開いてください。
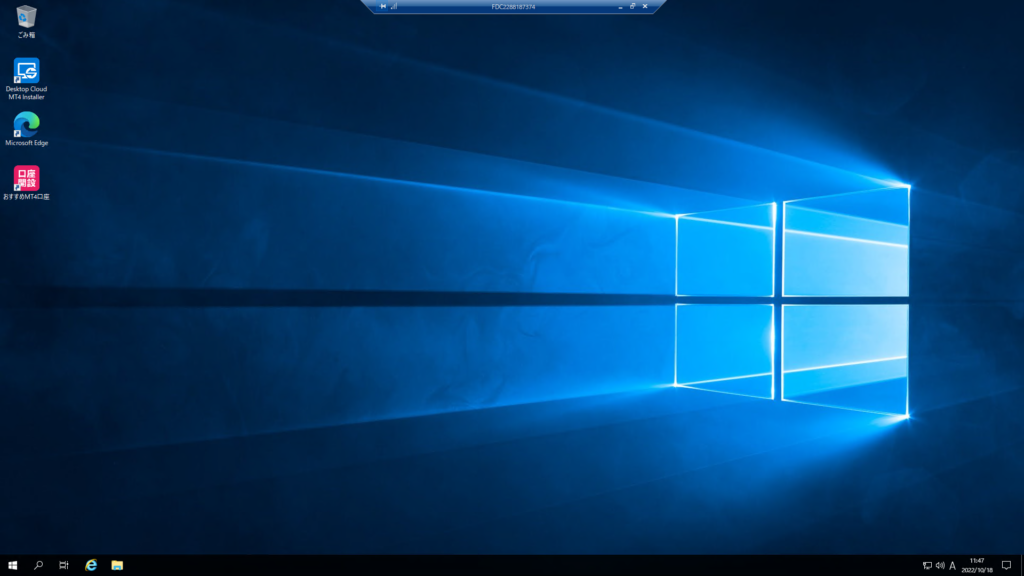
次に接続したVPS上でMT4のダウンロードを行います。
「Microsoft Edgeのブラウザを起動」してください。
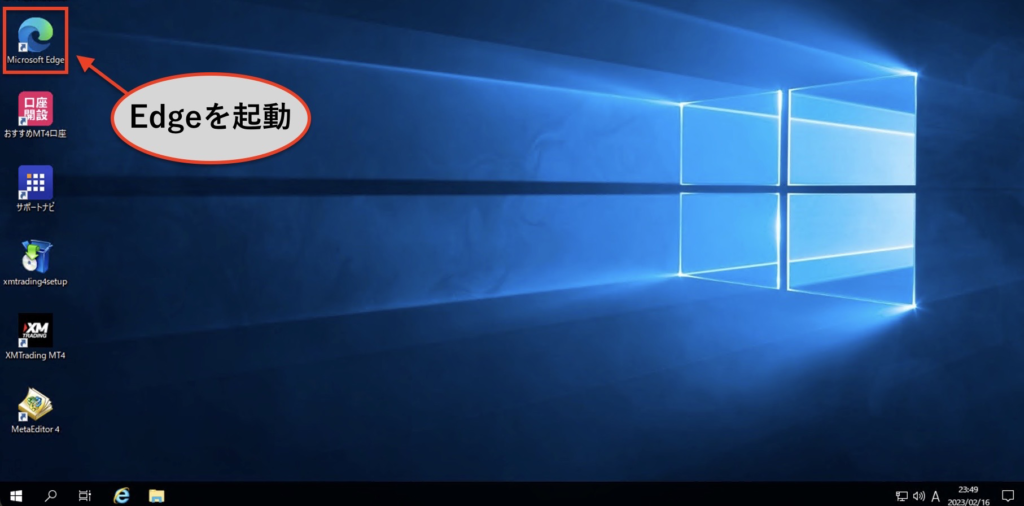
まずは起動させた「Edge」で「HFM MT4 ダウンロードと検索」します。

するとHFMの公式サイトが出てくるのでクリックして開きます。

赤枠の「取引」→「MT4」を選択し、「MT4をダウンロードする」をクリックしましょう。
下のような画面になりますので「Windowsにダウンロード」をタップします。

ダウンロードできたら右上に表示される「ファイルを開く」をクリックしましょう。

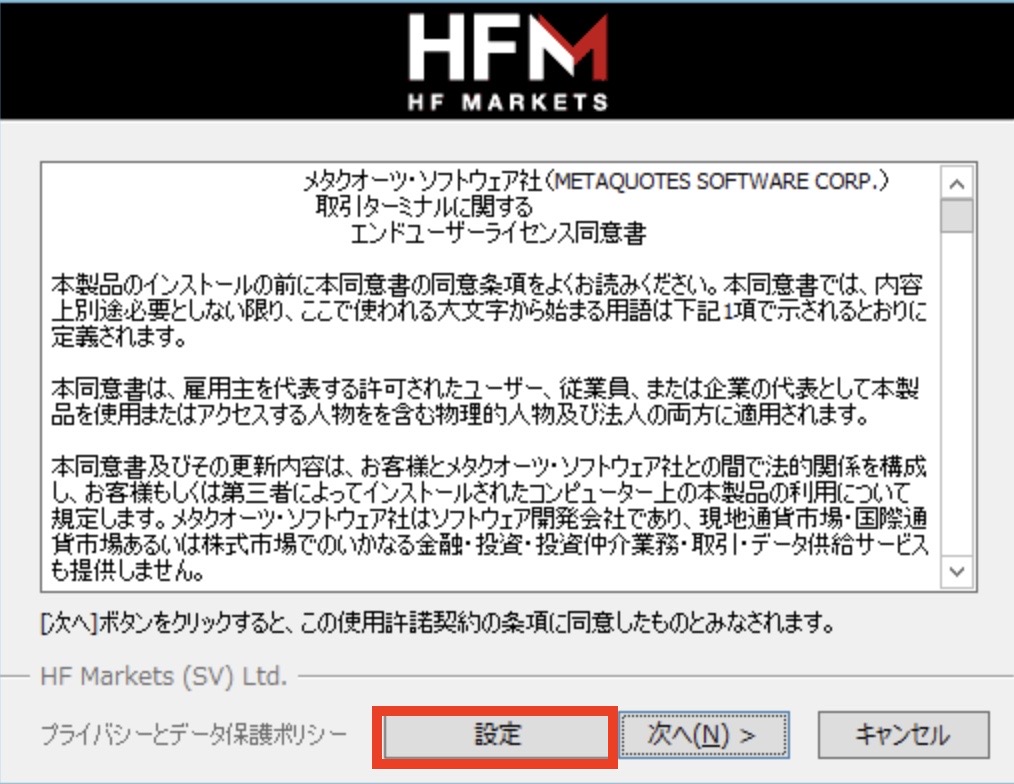
するとHFMのインストールフォルダを設定する画面が出ますので「設定」をクリックしましょう。
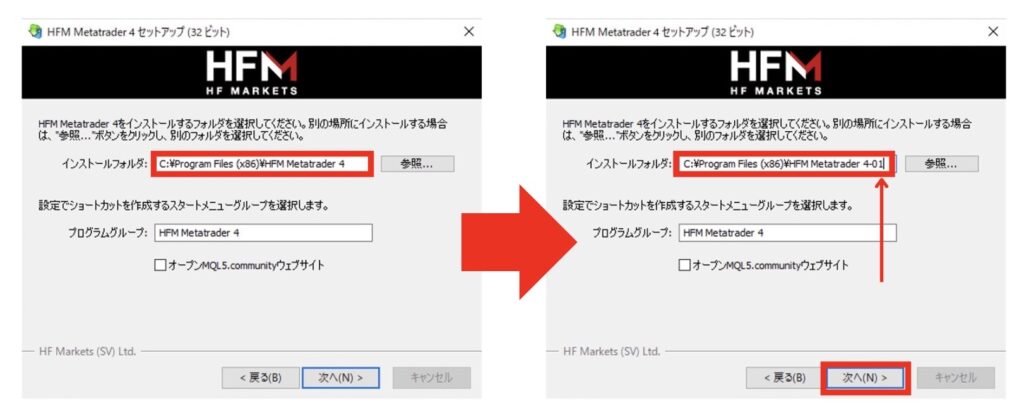
そうすると次の画像のような画面が出ますのでフォルダ名を変え、「次へ」をクリックしましょう。
ゆーしん※後々、複数のEAを稼働させることを考慮してファイル名の最後に「01」などと追加しておきましょう。
例)
変更前:「C:\Program Files (x86)\HFM Metatrader 4」から、
変更後:「C:\Program Files (x86)\HFM Metatrader 4-01」のような感じです。変更する名前はわかりやすくしてください。
※2つ目以降のEAをセットする場合には、
「「C:\Program Files (x86)\HFM Metatrader 4-02」
というように、名前を変更していきましょう。
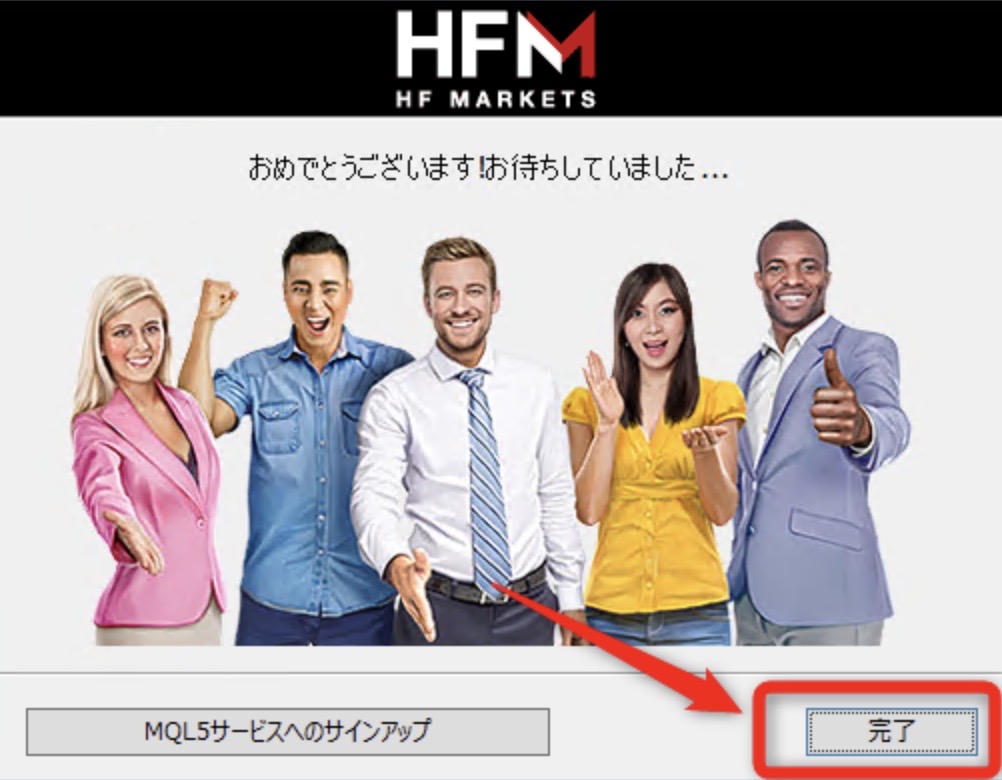
そして「完了」をクリックすると、自動的にMT4が起動します。
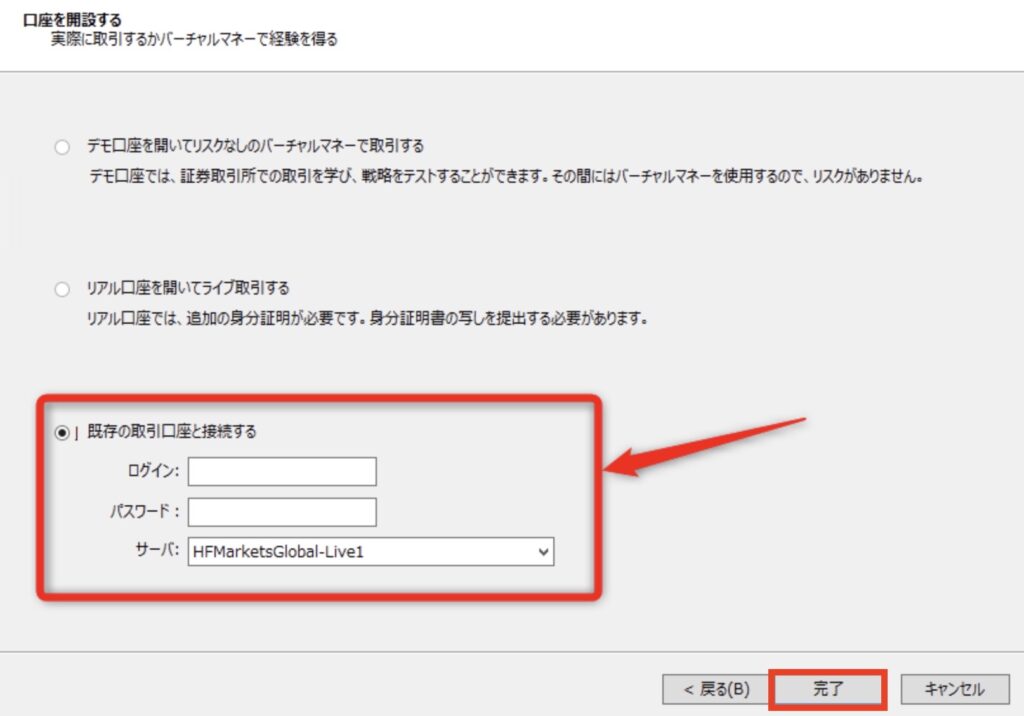
MT4が立ち上がると下のような画面が表示されますので、HFMのサーバーを選択して「次へ」をクリックしましょう。
「既存の取引口座と接続する」 を選択しご自身のログインIDと、
パスワードを入力し、 「完了」をクリックします。
ログインできたら、これでHFMのMT4はインストール完了です。
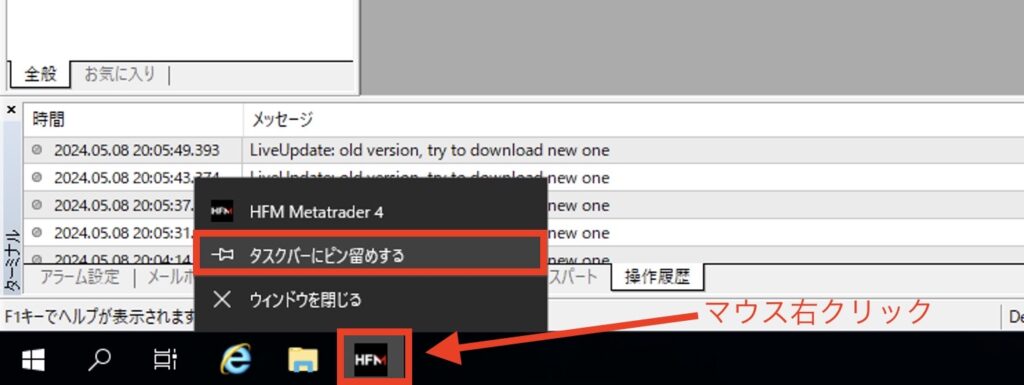
いつでもすぐに開けるように、画面下の「HFMのアイコンを右クリック」して「タスクバーにピン留めする」をクリックしましょう。
ゆーしんそうすることで、MT4を閉じても画面下のHFMのアイコンをタップするとすぐにHFMのMT4を起動できるようになります!
 ゆーしん
ゆーしん次はMT4の初期設定からEA導入手順を解説していきます!
②MT4の初期設定〜EA導入手順
MT4のインストールとMT4にログインが完了しましたら次はMT4の初期設定とEAの導入を行なっていきます。
こちらも詳しく解説していきます。
MT4の初期設定
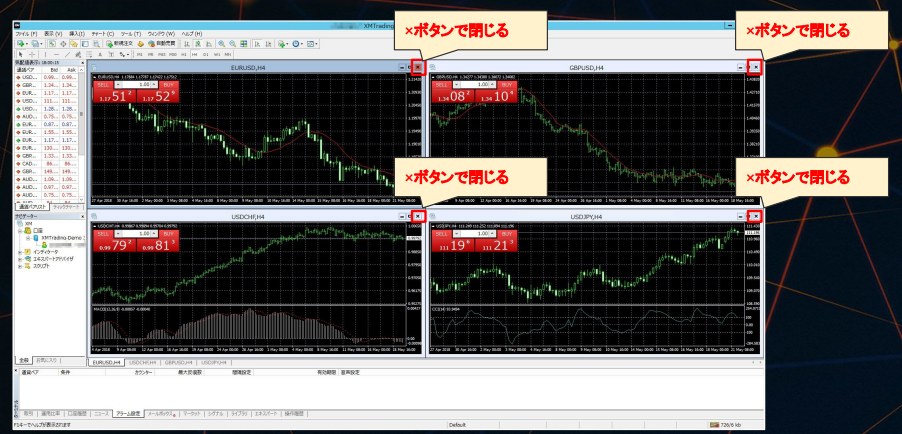
まずは下記のように「×」ボタンを押してチャートを閉じてください。
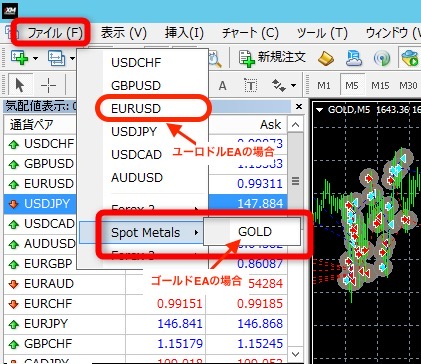
次にチャートを表示させます。
「ディバイン」を利用する方は「EURUSD」EAなのでチャートはEURUSDを開きます!
【EURUSD EAの場合】
ファイル ▶ 新規チャート ▶EURUSDをクリック
【GOLD EAの場合】
ファイル ▶ 新規チャート ▶ Spot Metals ▶ GOLDをクリック
※セント口座の場合は「EURUSDc」「GOLDc」を選択しましょう。
 ゆーしん
ゆーしんこれでMT4の初期設定は完了です!
次にEAを導入していきます!
EA導入方法
次にEAの導入方法について詳しく解説していきます。
公式LINEで受け取ったEAファイルをMT4に設定していきます。
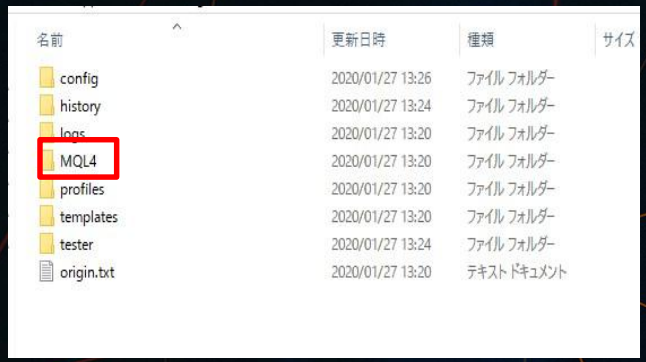
ファイル ▶ データフォルダを開く をクリック
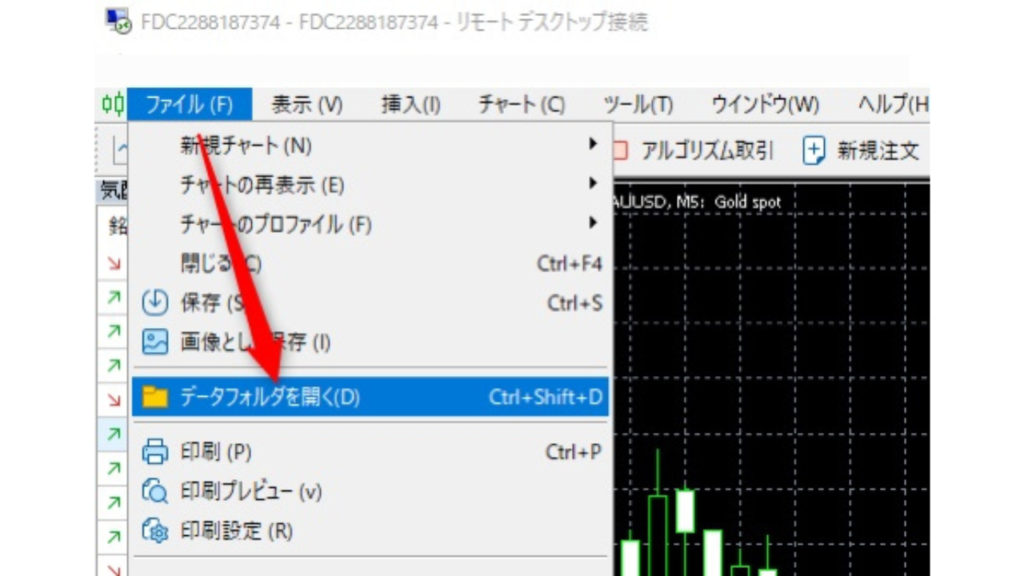
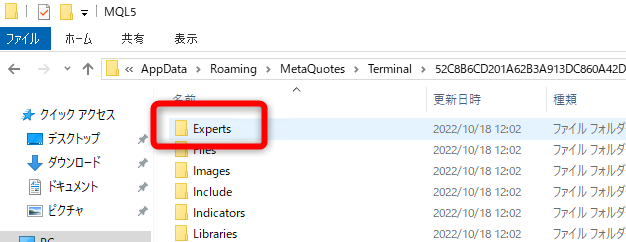
「MQL4」フォルダを開きます。
次に、「Experts」フォルダを開きます。
次にお送りしているEAファイルをVPSではなくご自身のパソコンに保存してください。
(※保存したEAファイルは開く必要はありません。ダウンロードするだけでOK)

保存したEAファイルを先ほど開いたVPS上のフォルダ内に移動させます。
(EAファイルをマウスでコピーしてVPS上のフォルダ内で貼り付けしてもOKです)
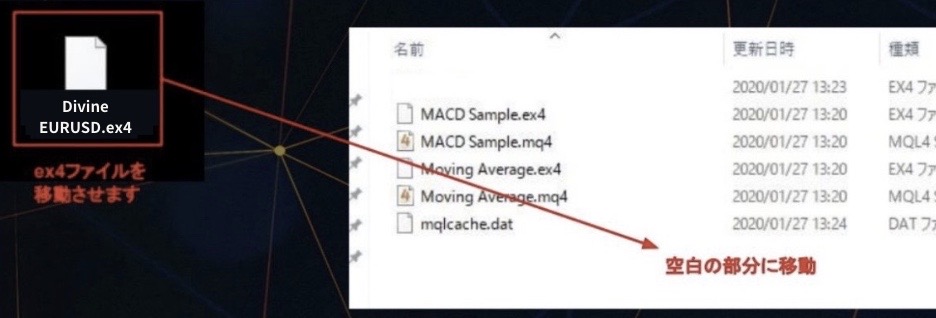
下の画像のようにファイルが表示されればOKです。

ファイルが移動できたら、表示しているフォルダは閉じてもOKです。
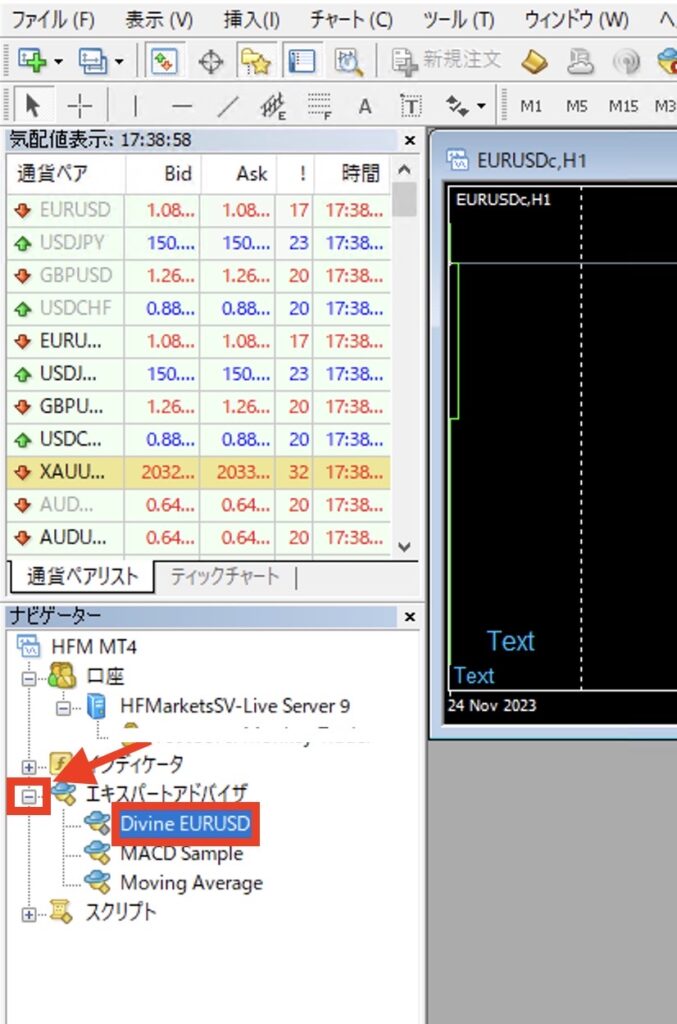
MT4の画面左側に表示されている「エキスパート」を右クリックして「更新」をクリックしましょう。
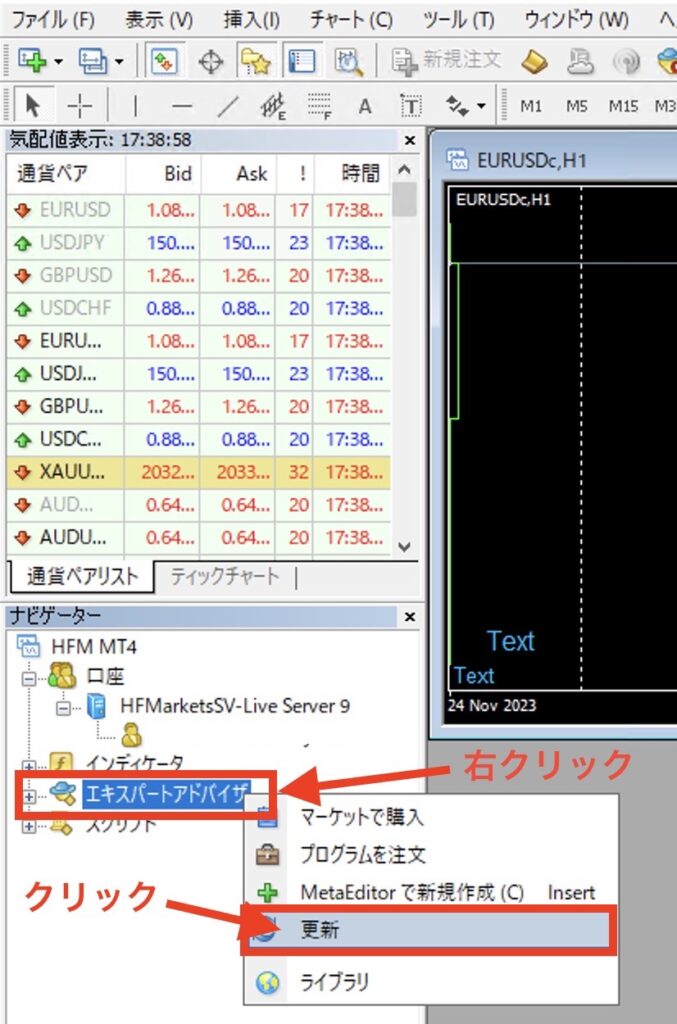
更新後、エキスパートアドバイザの欄にファイルに保存したEA名が表示されていればOKです!
そして保存したファイルを右側のチャート部分にドラッグアンドドロップします。
(マウスを左クリック長押ししながら離す)
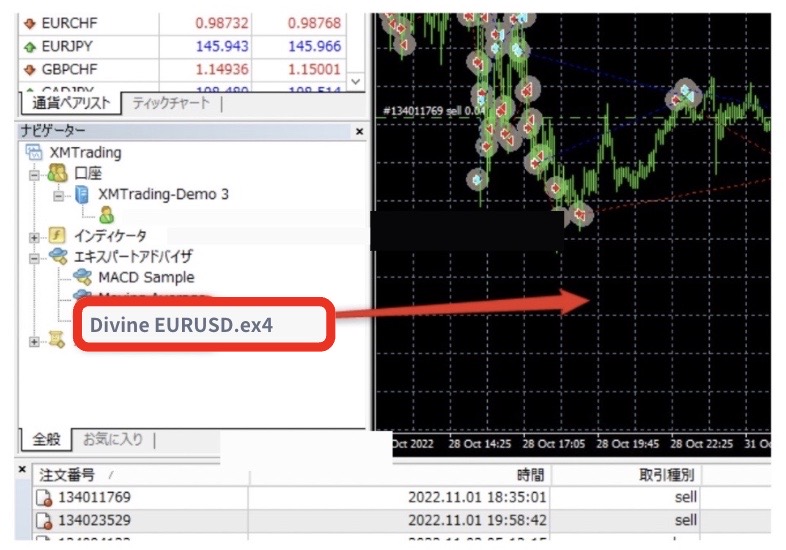
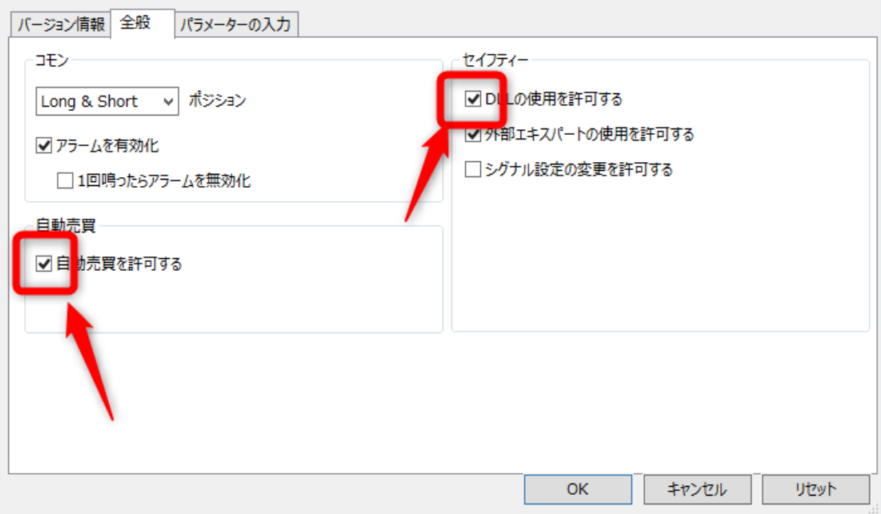
すると下記のようなポップアップが表示されますので、
2つの項目にチェックを入れて「OK」をクリックしてください。
 ゆーしん
ゆーしんEAの導入はこれで完了です!
あとはシステム設定してEAを稼働させるだけです!
③システムの設定・稼働スタート
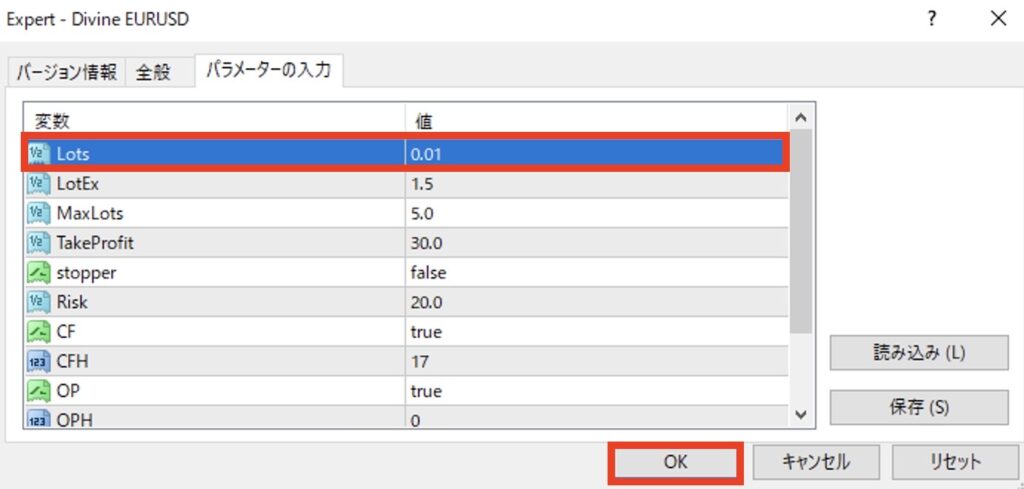
まずはチャート右上の顔文字🙂をクリックしましょう。
するとパラメーターを入力画面が表示されますのでロット設定を行いましょう。
設定したら「OK」をクリックしましょう。
ゆーしんロット数はEAによって推奨設定があるので各EAの推奨設定に従って入力ましょう!
分からない場合、公式LINEへ気軽に聞いてください♪
ディバインEURUSDとEURGBPを運用される場合の推奨ロットは以下のようになります。
プレミアム口座:30万円0.01ロット
セント口座:3万円:0.1ロット
次に自動売買ボタンをクリック。
ゆーしんここをクリックするとついに自動売買がスタートします。
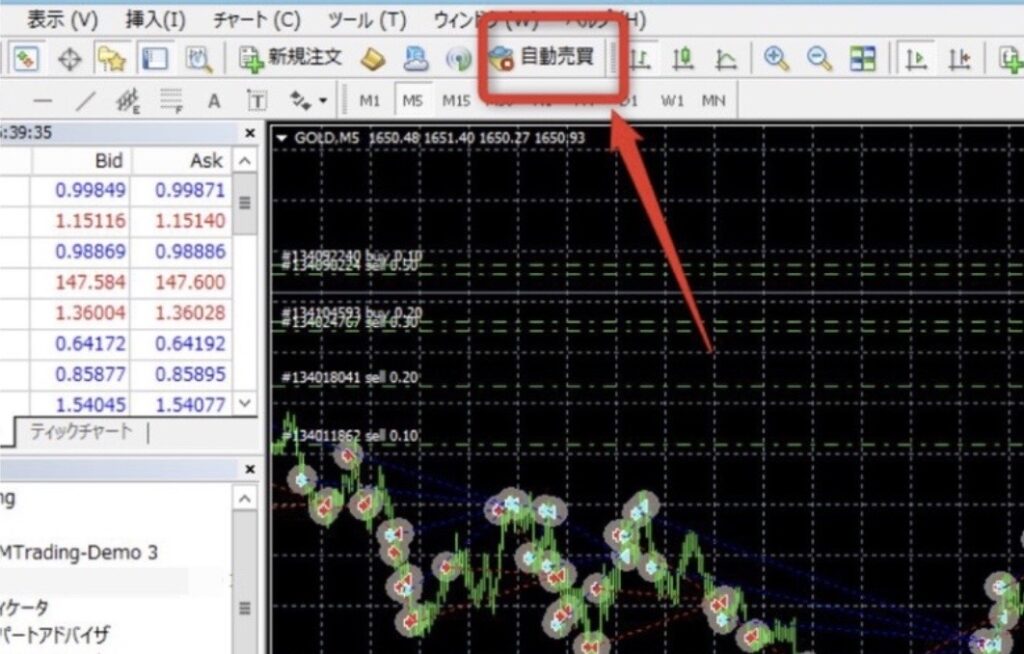
これでEAの運用がスタートされます。
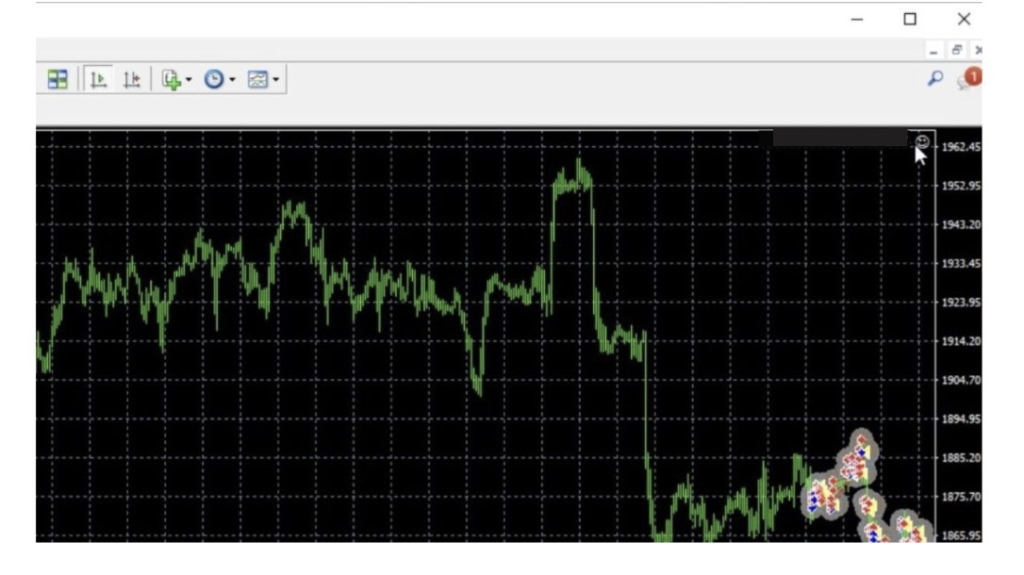
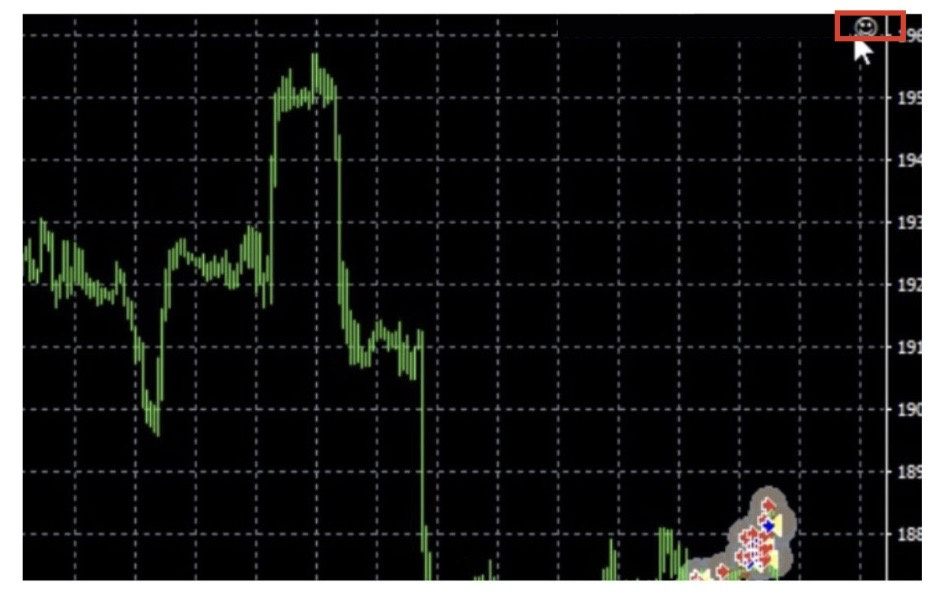
オンになっているかの確認は
下の画像用に顔文字が😕→🙂になっていれば自動売買がONになっていることが分かります。
 ゆーしん
ゆーしん自動売買をスタートするとポジションをエントリーしていきますので、EA運用をお楽しみください!
※資金が0の状態では自動売買をONにしないでください。
※ポジションを取るまで時間がかかる場合があります。
以上がEA稼働までの一連の作業となります。
何かわからないことがあれば以下の「ゆーしん相談室サポートLINE」へ気軽にお聞きください!